• 0 Posts
  • 24 Comments
Joined 2 years ago
cake
Cake day: June 14th, 2023

help-circle
  • ffhein@lemmy.worldto3DPrinting@lemmy.worldFilament won't adhere?
    link
    fedilink
    English
    arrow-up
    2
    ·
    edit-2
    15 days ago

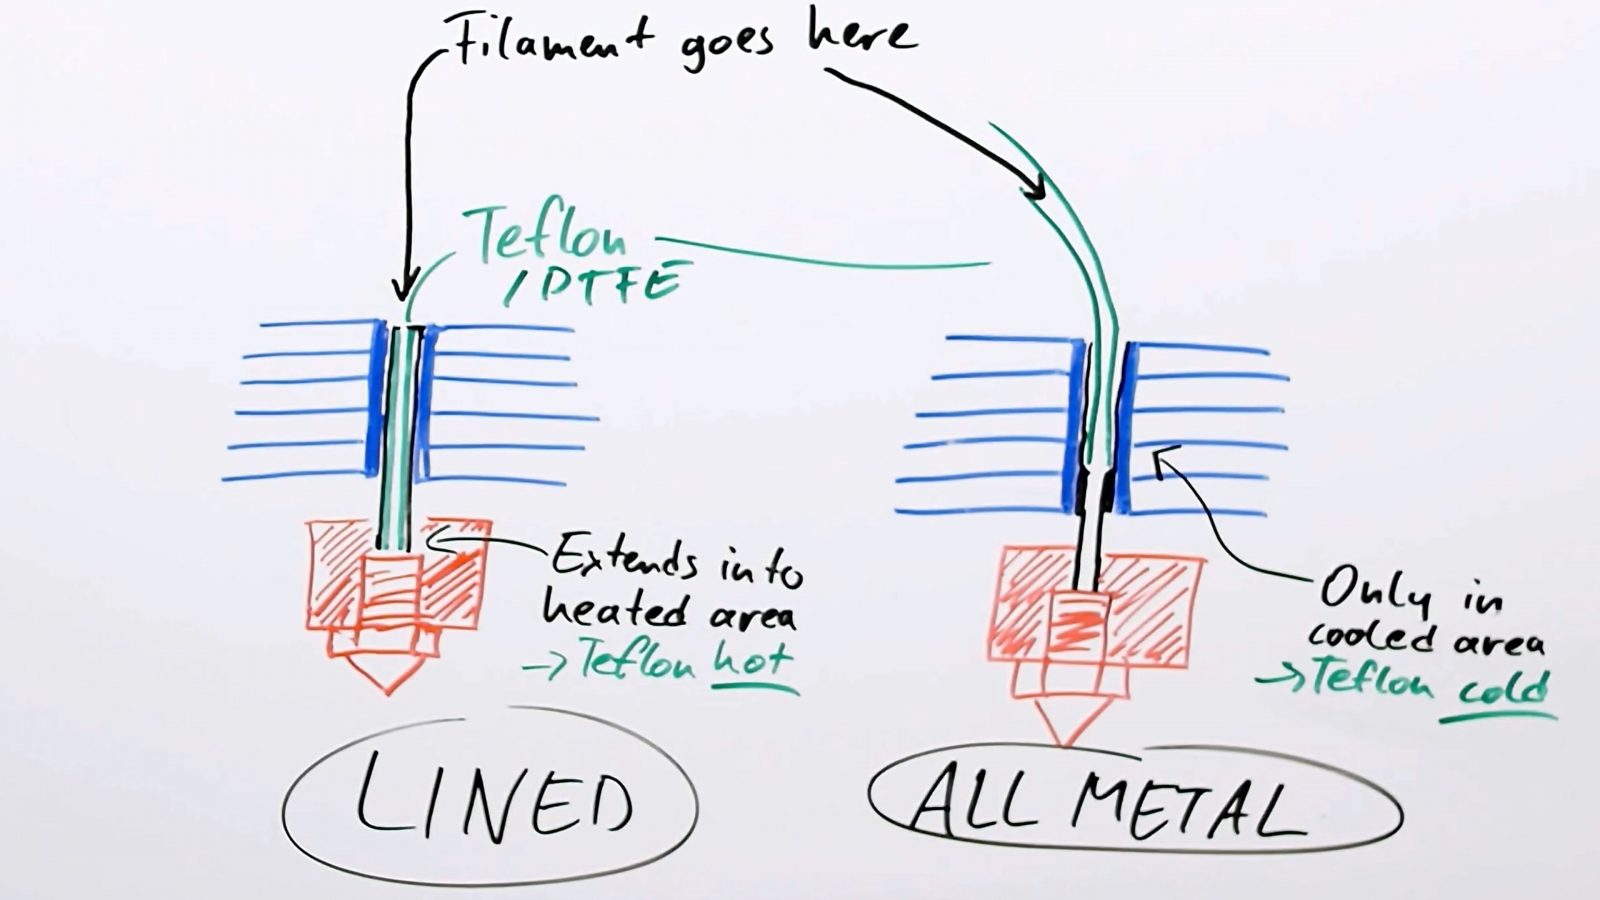
    Filament not sticking to itself sounds pretty unusual… Found this review on youtube. The channel has 6 subscribers and I have no idea if it’s legit or disguised marketing, but all the comments mention similar problems as yours. There’s also this review, with more negative comments. One person says they managed to get good prints by raising the print temp even more, but don’t do that if you have a PTFE lined hotend. I.e. only try higher temps if you know for sure that you have an all metal hotend.


  • ffhein@lemmy.worldto3DPrinting@lemmy.worldFilament blobs
    link
    fedilink
    English
    arrow-up
    2
    ·
    21 days ago

    Maybe something is wrong with the script generating these test prints, if you don’t have any similar problems with normal prints?

    In addition to the blobs in the middle of the circles, I think it looks overextruded/blobby every time it changes direction. E.g. if you look at the -20 sample, it looks generally underextruded as one would expect. Though it’s also blobby around the edges, where the lines make a U-turn. Since the printer usually slows down at turns (unless your acceleration is set insanely high) this could be an indication that you’re exceeding your hotends melting capacity, i.e. either temp is too low or speed is too high, so it would be interesting to know what you calibrated those values to. I don’t think this is usually associated with random blobbing in the middle of the print, but could be worth checking just in case.


  • Paper levelling is not an exact method, you might need to manually adjust the Z offset depending on how the first layer looks. It’s also something you generally don’t need to do if you have a probe like crtouch, as it will be used to ensure that the nozzle is at a consistent distance from the bed everywhere, and the Z offset will decide how big that distance should be. Just be careful when adjusting the Z offset so you don’t end up ramming the nozzle into the bed, make small adjustments. If you put a lamp behind the printer you can visually check if the nozzle touches the bed, e.g. if you manually move the nozzle to 0.2mm height after adjusting Z offset, can be good to do a manual check before starting a full print.

    Unfortunately your photos are too blurry to give feedback, but if you want to you could try this: Print only the first layer for something simple and stop the print. Get a couple of strong lamps and put them next to your printer. Move the camera as close to the print as it can focus, could be around 20cm for a phone camera. Steady the camera against something solid, for example a stack of books.

    If you want to keep trying to level on your own, perhaps this infographic could help. SuperSlicer has a built in calibration wizard which might also be useful.

    And some general questions which might help troubleshooting your issue:

    • What kind of glue did you use? AFAIK it should have high PVA content, otherwise it might not do much.
    • How fast are you printing? Both first layer and rest of print. Printing too fast can lead to warping.
    • What nozzle size? Larger nozzles requires can require even slower speeds to avoid exceeding the hotend’s melting capacity.
    • Have you modified flow rate multiplier (slicer setting) or e-steps (printer firmware setting)?


  • It’s not just you, there’s a financial incentive to write “reviews” which convince the reader to immediately buy the product, because of referral links. Even disregarding that the fact that it takes much more time and knowledge to write an actual unbiased review, you’ll most likely earn less money as you might dissuade readers from buying it, or even if you just make them think a bit more before going through with the purchase and they end up buying the printer somewhere else. I’ve started referring to these kind of pages as “fake reviews”, it plagues almost every product category and it has made it very unreliable to use the internet for buying advice.

    Though I suppose it’s even worse for 3d printing, as some manufacturers have been known to pay youtubers for positive reviews and to lie about their competitor’s printers. And even the ones who don’t get cash in the hand still have some incentive to bias their reviews, as pointing out a printer’s flaws or recommending to buy something else would make them less likely to receive more free products to review in the future.


  • It’s literally the same (probably exaggerated) marketing material as Sovol themselves are trying to sell their Kickstarter project with, reformatted to look like an article. Not surprising that it has a couple of “Click Here to Buy Now: $999 $1299 ($300 off). Hurry, only 94/200 left!” referral links…

    It might be true that Sovol has made some of the least bad budget printers recently, but anyone who has brand loyalty to any of the companies that make cheap 3d printers in China is bound to get disappointed sooner or later. Years ago Creality also made relatively good printers, using high quality parts and with acceptable quality control (e.g. OG Ender 3 era) and when they became market leaders they dropped the quality, and I would be surprised if Sovol didn’t do the same given the opportunity. I’d wait a couple of months after it’s released, and try to find some actual reviews.

    3D Printing discord’s List of 3D printers even has a generic warning for Kickstarter printers:

    More of a warning against kickstarter machines, up until now almost all of them huge failures, with delays in shipping and troubles in terms of QC. They just use the early backers as free quality check/beta testing for the most part. Remember you are not buying a product on kickstarter, you are paying for a possibility to get a product.


  • Was just thinking that if the goal of your video was to showcase the difference between the bed slinger and the corexy, then it would’ve made a stronger point if you took advantage of its full potential. The MK4 even looks faster in the video, but I suspect it could be the angle and that the bed moving making its motions more visible.


  • Good recommendations, it’s almost the same list of upgrades that I’ve done to my E3v2. I went with a dual Z-screw upgrade which uses a sync belt instead of a second motor, since I use the stock board and didn’t want to run two steppers off the same driver (it should work IIRC, but it seemed annoying if they get out of sync since the printer can’t level them individually)

    Also never use that damn scraper everyone I know who has including myself has a scar from it lol

    I use it all the time if a model won’t come off easily. I grab the blade between two fingers, and then hammer the model from the side with the handle to knock it off the plate :)

    You do NOT need an all metal hotend with this, use the stock red one it’s all you need

    Technically the hotend becomes “all metal” with this, as the PTFE-tube does not go all the way down to the nozzle after the upgrade. Best illustration I could find